How to Edit and Customise Email Templates
Updated: February 16, 2025
Want to give your emails a personal touch? With TicketingHub, you can customise your receipt emails, pro forma invoices, and refund emails to reflect your brand, complete with your logo, essential details, and even a handy map link to your tour’s meeting point. Because nothing says “professional” like an email that actually looks like you wrote it.
In TicketingHub, you can customise email templates based on the type of email you want to modify. There are two categories of emails:
Account emails in TicketingHub include:
Receipt Emails – Sent to customers after a successful payment, with a receipt PDF attached.
Pro Forma Invoices – A preliminary bill issued before a tour is delivered. It outlines estimated costs, including fees, taxes, and any additional charges. Commonly used for corporate and group bookings, as well as international tour resellers who require formal documentation before finalising a tour.
Refund Emails – Sent to customers when a refund has been processed successfully.
Product emails are specific to your tour products. Examples include:
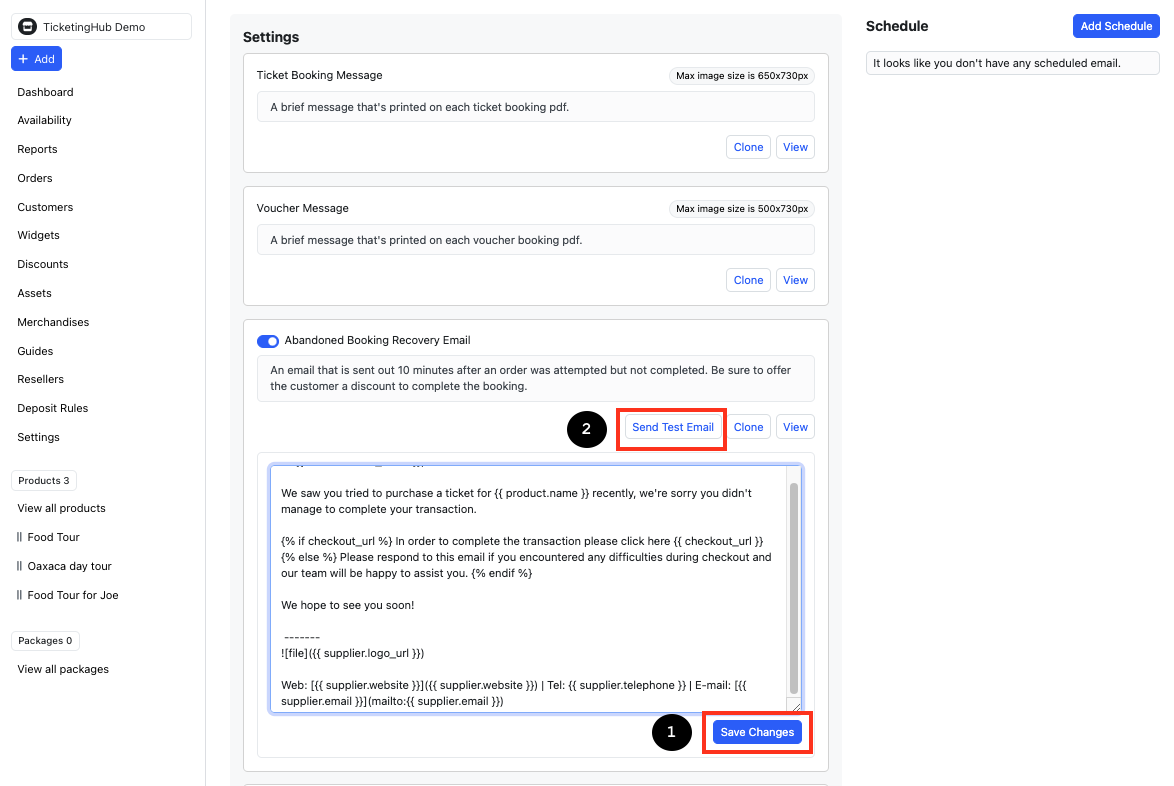
Abandoned Booking Recovery Email
Voucher Booking Confirmation Email
Ticket Booking Confirmation Email
Booking Changed Email
Booking Cancelled Email
Booking Reminder Email
Booking Feedback Email
You can customise your email templates, add your tour logo as an image, and include links to maps for your meeting location by following these steps:
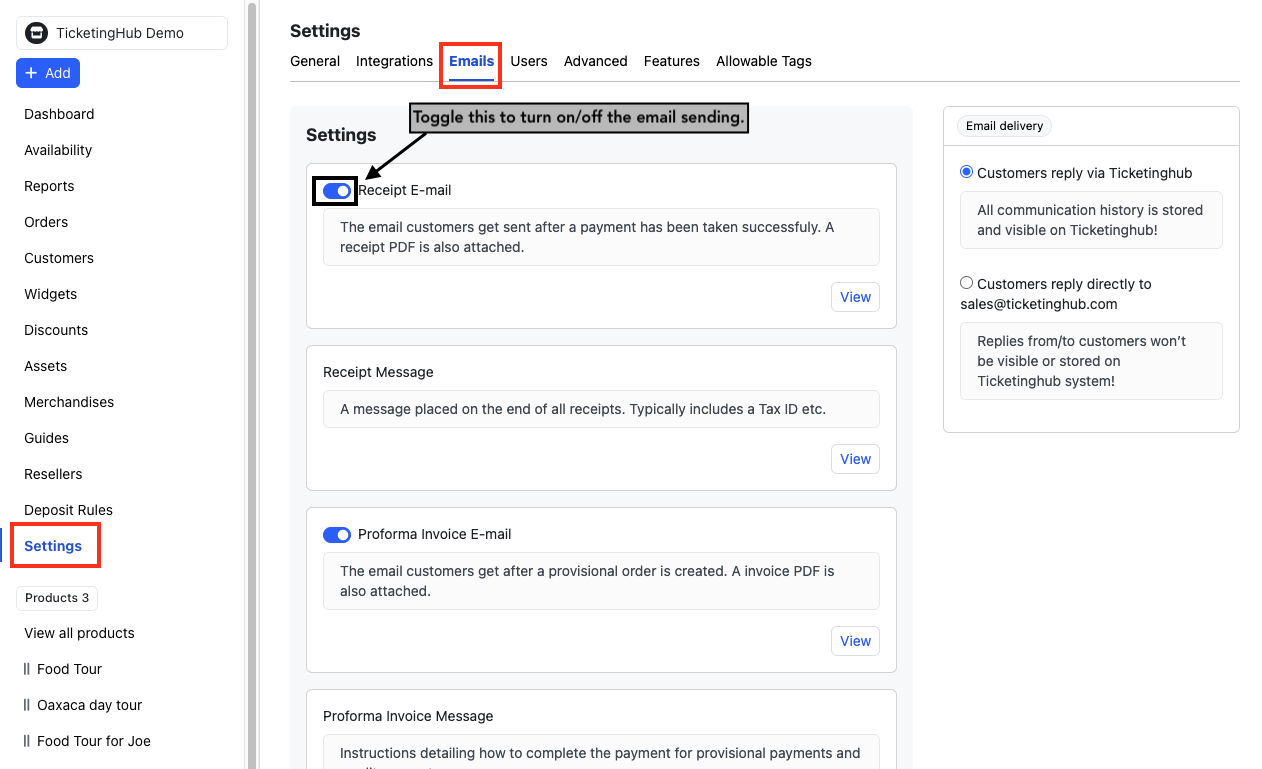
Go to Settings
Navigate to the Emails tab
Enable or disable emails – Choose whether to turn specific email types on or off.
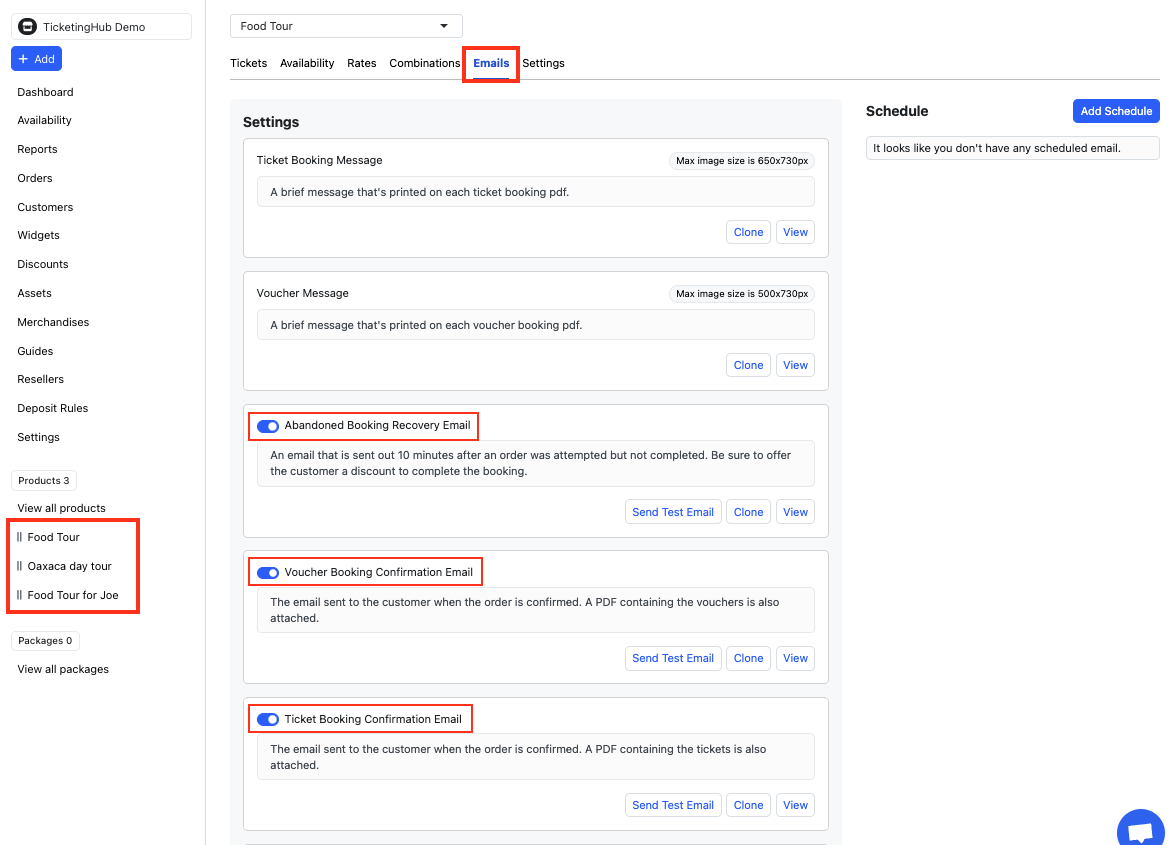
Click on a specific product
Navigate to the Emails Tab
Choose the type of email you want to edit and customise
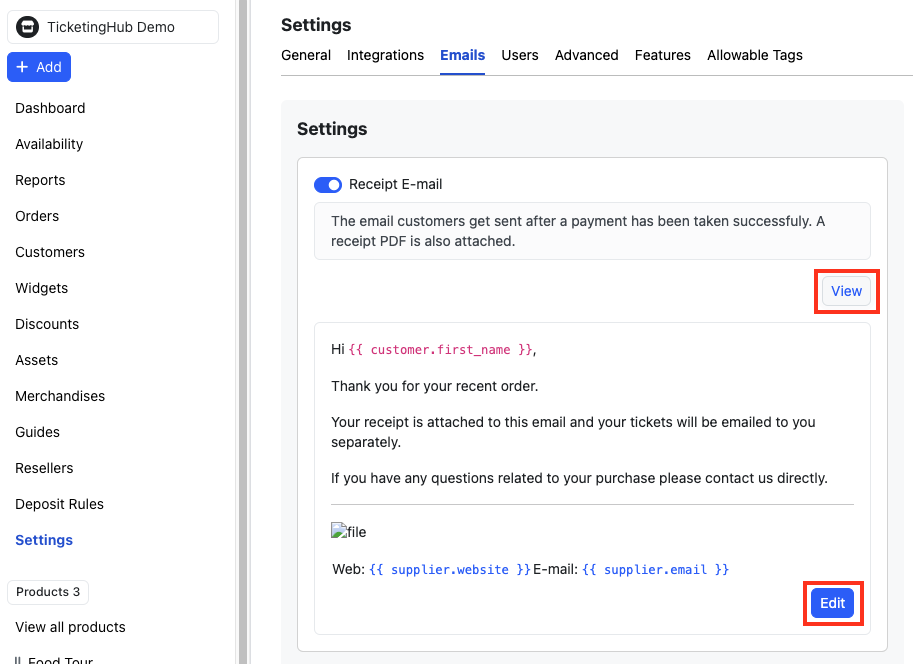
View the current template – Click on VIEW to see the email template being sent.
Edit the template – Click on EDIT to customise the content.
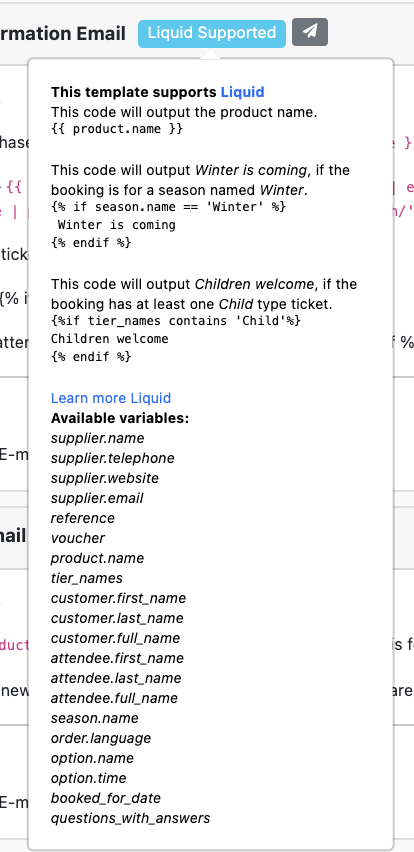
TicketingHub email templates use Liquid tags (enclosed in {{ brackets }}). These allow you to pull data from the system and personalise emails automatically. For example, you can include the customer’s first and last name so that emails feel more personal.
Example:
Here are more samples of the liquid TicketingHub supports:
TicketingHub email templates use Markdown formatting. To edit them properly:
Use StackEdit.io for editing.
Copy the email content from the TicketingHub editor.
Paste it into StackEdit.io.
Customise the text: bold important details, italicise, add bullet points, and insert images or links.
The left side of the editor is where you make changes, and the right side shows a live preview.
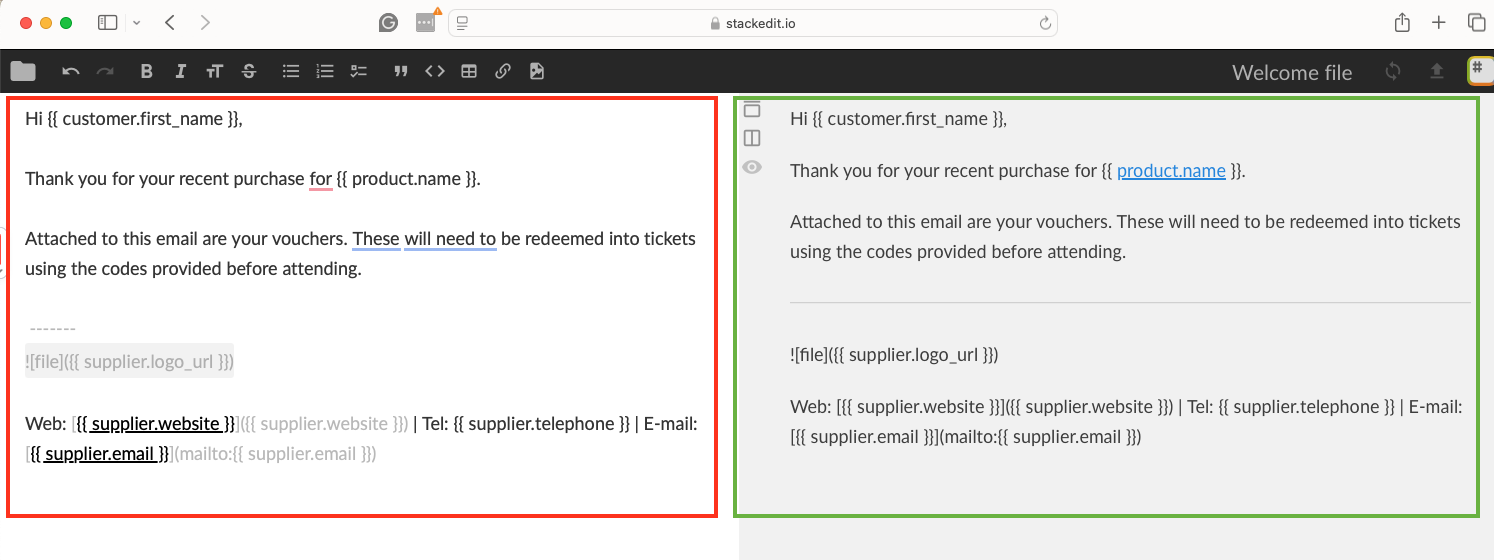
Once satisfied with your edits, copy the Markdown text.
Paste the edited text back into the TicketingHub editor.
Click SAVE CHANGES to apply updates.
Send a test email – Click on SEND TEST EMAIL to preview how the email looks in your inbox.
And that’s it! Customising your emails in TicketingHub is that easy. With these simple steps, your emails will look polished, professional, and perfectly on-brand. Now go forth and wow your customers with emails that feel as personal as a handwritten note (but way less time-consuming).
Want to give your emails a personal touch? With TicketingHub, you can customise your receipt emails, pro forma invoices, and refund emails to reflect your brand, complete with your logo, essential details, and even a handy map link to your tour’s meeting point. Because nothing says “professional” like an email that actually looks like you wrote it.
| STEPS ON HOW TO EDIT AN EMAIL TEMPLATE |
|---|
| 1. Go to the email template |
| 2. Edit the email template |
| 3. Edit email templates in markdown format |
| 4. Finalising the edits |
2 Types of Emails
In TicketingHub, you can customise email templates based on the type of email you want to modify. There are two categories of emails:
Account Emails
Account emails in TicketingHub include:
Receipt Emails – Sent to customers after a successful payment, with a receipt PDF attached.
Pro Forma Invoices – A preliminary bill issued before a tour is delivered. It outlines estimated costs, including fees, taxes, and any additional charges. Commonly used for corporate and group bookings, as well as international tour resellers who require formal documentation before finalising a tour.
Refund Emails – Sent to customers when a refund has been processed successfully.
Product Emails
Product emails are specific to your tour products. Examples include:
Abandoned Booking Recovery Email
Voucher Booking Confirmation Email
Ticket Booking Confirmation Email
Booking Changed Email
Booking Cancelled Email
Booking Reminder Email
Booking Feedback Email
How to Edit Email Templates
You can customise your email templates, add your tour logo as an image, and include links to maps for your meeting location by following these steps:
1. Go to the Email Template.
FOR ACCOUNT EMAILS:
Go to Settings
Navigate to the Emails tab
Enable or disable emails – Choose whether to turn specific email types on or off.
FOR PRODUCT EMAILS:
Click on a specific product
Navigate to the Emails Tab
Choose the type of email you want to edit and customise
2. Edit the email template.
View the current template – Click on VIEW to see the email template being sent.
Edit the template – Click on EDIT to customise the content.
Supplementary Information: Using Liquid Tags in Email Templates
TicketingHub email templates use Liquid tags (enclosed in {{ brackets }}). These allow you to pull data from the system and personalise emails automatically. For example, you can include the customer’s first and last name so that emails feel more personal.
Example:
Here are more samples of the liquid TicketingHub supports:
3. Edit Email Templates in Markdown Format
TicketingHub email templates use Markdown formatting. To edit them properly:
Use StackEdit.io for editing.
Copy the email content from the TicketingHub editor.
Paste it into StackEdit.io.
Customise the text: bold important details, italicise, add bullet points, and insert images or links.
The left side of the editor is where you make changes, and the right side shows a live preview.
Once satisfied with your edits, copy the Markdown text.
Paste the edited text back into the TicketingHub editor.
4. Finalising the Edits.
Click SAVE CHANGES to apply updates.
Send a test email – Click on SEND TEST EMAIL to preview how the email looks in your inbox.
Conclusion
And that’s it! Customising your emails in TicketingHub is that easy. With these simple steps, your emails will look polished, professional, and perfectly on-brand. Now go forth and wow your customers with emails that feel as personal as a handwritten note (but way less time-consuming).
Updated on: 24/02/2025
Gracias.